~ Makeup Tips for College Girls ( or a college budget) ~
July 28, 2010
College girls are a busy group. Between a new school, new social activities, plenty of adjustments and family commitments… All this activity doesn’t leave a ton of time to fuss over how they look much less a lot of leftover cash to buy expensive makeup. Here are a few ideas to speed up that “off and running” beauty routine for college girls or anyone who just wants to save money or simplify on busy days…
Here is a routine to achieve a quick, affordable daytime look using only 5 products and it can be done in about 5 minutes. Add more if you have the time, but here are some key basics:
TINTED MOISTURIZER: Seconds to apply and just enough coverage for daytime activities. Use your clean hands for maximum blending and time efficiency. Cover Girl, BOOTS NO 7 and Neutrogena all have a range of tinted moisturizers easily found in drugstores. Find your shade and get going!
TINTED LIP BALM: Just enough color to give you some life but not enough to keep anyone from taking you seriously. All lips need moisture and it’s easy to keep handy in your bag for touch ups when you need it. NIVEA, NEUTROGENA and BURTS BEES all come to mind. Find them any/everywhere!
KOHL EYE LINER PENCIL: Choose brown or navy – Neutral enough to be *neutral” but not overpowering like black. (Save black for nights on the town.) Even the green would work great for daytime eye definition. Simply line upper lash line and smudge with a damp Q-tip to give eyes some shape ( and a subtle , daytime smokey look) and your face some overall balance. RIMMEL Soft Kohl liners are available almost anywhere, affordable and easily smudge-able.
MASCARA: A simple, inexpensive mascara like Maybelline FULL n SOFT will give you just enough definition without the flakey, crispy lashes of some mascaras. One coat will do the trick. It does exactly as promised – makes lashes full and yet, still soft. Guess where you can get it…

BRONZER: A little bronzer goes a long way so don’t abuse it. You want a sun-kissed look, not a sun-abused one. Use a fluffy powder brush ( tap of excess) and place in areas the sun would naturally hit – your cheeks, chin and forehead. If you are concerned that it may seem ” too much”, try just applying it sparingly to the outer edges of your face and blend well. NYX makes an affordable bronzer you can find in most drugstores.
It’s so affordable, you may even have some money left over for a cute new bag to keep it all in! If not, stay tuned for a giveaway coming soon where you can win an adorable, colorful bag for your makeup and accessories. Subscribe to this blog for updates or find me on FACEBOOK and become a fan for the latest on the giveaway!
Above and beyond anything, skin care is the most important part of any makeup routine so be sure to wash well at night and stay consistent with removing all traces of makeup before going to bed. Plenty of sleep, water and nutritious food don’t hurt, but we all know how hard that is on a busy college schedule so do the best you can.
~ Save on Spring/Summer Looks ~
March 14, 2010
If you are a beauty product fanatic and always buying more than you should with each new season, here are some ways to save a few bucks and stretch the dollars you spent in the fall/winter. Using your current products and a few minutes of your time, you can create fresh spring/summer looks without spending a dime;)

FOUNDATION: For those who wear a full coverage foundation in winter, and buy a whole new foundation for summer…save those dollars! By simply mixing your daily facial moisturizer with SPF and a hint of your full coverage foundation, you have now created a perfectly matched tinted moisturizer that is sun-safe and saves money. Mix in a small jar and take on vacation to lighten your makeup bag;)
LIPGLOSS/BLUSH: Save on the blushes and glosses by purchasing a pigment (found at MAC, Urban Decay, Barry M ) you can mix to create new products. A hint of pigment when mixed with an inexpensive clear gloss and you can create a perfect lip color. A tap of pigment on the apple of your cheeks and blended well is all you need to give cheeks a pop of color. Use rosy and coral shades for a fresh spring look, or go for bronze/peach for a healthy summer glow. You can also add the pigment to a light moisturizer for an easily blendable cream blush shade. Mix different pigments to create new and unique colors to suit your style fancy;) Pinks and Bronzes make beautiful blends.

TIP! Keep pigment and glosses in small 3g or 5g jars ( you can purchase these at coastalscents.com) and pack them in your vacation bag to save space;)

POWDER: Just grab some blotting sheets to keep handy if you are worried about oily breakthroughs. You can purchase a 50 pack from ELF (eyeslipsface.com) for only $1 USD. With your tinted moisturizer doing it’s magic, let your skin shine through and save money. Dewy skin creates a radiant and youthful look perfect for the warmer seasons, so ditch the powder, Skin is in!
NAIL POLISH: Just keep a clear polish handy and mix with a hint of your pigments, you can customize the perfect seasonal shade. (For those with delicate nails, put a hint of pigment in a clear nail strengthener)
EYELINER/BROW PENCILS: Skip the harsh liners. Simply dampen your eyeliner brush with a bit of visine (yeah, use it to wake up those tired eyes too!) and dip into your favorite dark shadow for perfect definition to your peepers. Use brush dry with dark brown shadow to lightly fill in eyebrows. A hint of bronze shadow in the brow arch is also nice to add some MMMPH to your summer look;)
BODY LOTION: add a touch of pigment in a Vanilla, Bronze or Peach color to your body lotion to create the ultimate summer shimmer. Add a few drops of essential oil ( lavendar or citrus) if you want to add a scentual touch to your seasonal beauty routine;)
Enjoy these tips and enjoy the upcoming Spring/Summer Seasons!
Kristine Marie
~ Multi-Tasking Makeup Brushes ~
January 20, 2010
I often get questions about brushes when I talk to women about makeup. What kind do they need? What is each used for? And honestly, there is never a perfect answer that fits all. Much depends on what makeup you use, what effect you want and what your budget is. In this post, I will share some of my favorite brushes which also happen to be multi-use brushes…see a connection? I will also list some suggestions for affordable alternatives to the most popular brushes.

FLAT TOP BRONZER/BUFFER ( kabuki-style ) -It has many names but is fairly distinct with it’s densely packed hair. While it can be used for bronzer, mineral foundations and powders, it is also commonly used for buffing in liquid foundation. Yes! Liquid! I first blend in my foundation with my fingers, and then buff it to a soft, streak-free finish. A favorite among some Makeup Artists is the SMASHBOX #19 Brush at a whopping $52 USD price tag. A budget option is the Coastal Scents KABUKI ON A STICK for a reasonable $5.95 USD.
ANGLE BRUSH – I LOVE these brushes! I use them for everything! Well….almost. They are great for filling in brows with brow powder, lining eyes with powder or cream liners, creating precise lip lines and drawing a sharp crease with eye shadows. They are also great for just under the brow bone when you want a thin, clean highlight. I swear by mine which is a MAC 266 and costs about $19.50 USD, but for those on a budget, REXART offers a Loew Cornell brush called the 1/4″ Angular Rose Shader for about $3 USD.
STIPPLING/DUO FIBRE – A synthetic/real hair brush with black hair and white tips (nicknamed a “skunk”) this brush is good for stippling on liquid foundations but is also commonly used to dust on powder products including blush and bronzer. MAC makes a brush called the 187 Duo Fibre Face Brush for a hefty $42 USD, but Sigma Makeup offers a similar brush, also called a 187 Duo Fibre Brush for an affordable $16 USD.
FLUFFY BLENDER BRUSH – So yes, this brush can be used for applying eye shadow and blending it, but it can also be used to buff in concealer under eyes and to set it with powder. I have also been known to use this brush to apply a hint of highlighter on the top of cheekbones and/or above the outer corner of the brow, down the nose and above the cupids bow. MACs 224 brush is $28 USD, but an alternative is the REVLON contour shadow brush for about $6.99 USD.
Fan brushes can be used for everything from powders, blushes and bronzers to highlighting and sweeping away fallout from dark shadows. Some fine tip eyeliner brushes can be used as lip lining brushes too. Concealer brushes are great for applying eye primer and cream shadows…the list goes on an on;)
* When using brushes for multiple things during the same application, it is good to have a bottle of brush cleaner handy. I like Sephora daily brush cleanser as it spot cleans well, is easy to use and dries quickly. It is also anti-bacterial and comes in 2 sizes ranging from $6 USD to $14 USD.

Now, I tend to use most of my brushes in many different ways, but these are just some ideas to help out a few folks interested in making the most of their investment into makeup brushes. As many of you know, there are no hard and fast rules for how to apply anything anymore, or with what tools. Many adapt to what we have and if we only had Qtips and Cotton balls we would adjust…BUT, having a handful of multi-tasking tools sure helps. Feel free to share your multiple uses for your brushes, or ask questions in the comments section below;)
More information on brushes, a list of my must-have daily brushes, brush maintenance, etc coming soon. Stay tuned by subscribing here for updates or visit me at FACEBOOK.
~ Quick Fix for Flaky Lips ~
January 4, 2010

Be it summer or winter, dry lips are enough to ruin anyones day. Lipstick and glosses look terrible and kisses just aren’t as fun with sore lips. Now, there are a ton of pricey little fixes for your pucker wrapped in pretty packages ( THAT was a mouthful!) but, getting a soft and smooth pout is cheaper and easier by just heading over to the kitchen.
Yes! Your kitchen is the key!
Just combine the following for a one-time-use lip scrub to exfoliate and moisturize in one easy application:

1/2 tsp sugar ( finely granulated) and several drops of olive oil to make a paste
* This is not an exact science, so eyeball it and make your best judgement on texture.
It should look like this:

…and that’s it. Really!
Just gently rub onto lips for a few moments, rinse or wipe clean with a warm washcloth and follow up with a normal lip balm or …my favorite…

For extra rough lips, work in the scrub with the tip of a wet washcloth for extra strength de-flaking. Before you know it, you will look like Angelina Jolie!
Ok, well maybe not, but you WILL have some serious soft kissable smackers;) With the simple and safe ingredients, this blend is also perfect for children and some even like to help mix it, so a fun project for all;)
* If you have extra, put in a small airtight container like the one pictured ( purchased in a 12 pack at any craft store) and store in the refrigerator for up to 3 days. Exfoliate twice a week for best results.
So, that’s the Makeup Tip Du Jour! Now, go forth and fix your lips and stay tuned for more tips, reviews, looks, free makeup giveaways, industry news and other girly glam stuff coming soon;) You can subscribe for automatic updates by clicking the icon on the lower right of this page.
KristineMarie
*For recent work, check the LOOKS section on the right—->
As always, subscribe by clicking the link on the lower right of the page for updates, tips, giveaways and photo updates and more.
~ Cool or Warm Tones ? ~
October 4, 2009
Choosing foundation is hard enough. There are so many types; liquids, creams, gels, powders..and THEN determining what formulation based on if your skin is dry, oily, or some weird combination like most of us;)
Now, determining your “undertones”. I know, I know….as IF it isn’t complicated enough already…yet one more tidbit of information needed to pick the right color for your foundation.
So, here is a tip that may help you.
Take a look at your wrists. Are the veins BLUE? If so, and you have some degree of pink in your skin, you are most likely cool toned. Cool toned ladies also tend to look best in Silver Jewelry and sunburn easier than others.

If those veins are more green and you see hints of yellow in your skin, you are warm toned. Warm toned ladies tend to look better in Gold jewelry and do not sunburn easily.

If you don’t find that you can easily relate to either, you just may be a lucky “neutral” gal.
So, that is one quick and easy way to make a determination when choosing shades of foundation, color cosmetics, or clothing.
You can also visit a makeup counter and let a MUA color match you, though make sure not to buy ANYTHING until you have see it on your skin in natural light (outside).
* I personally feel for daily looks that going with your natural skin tones is a good idea for foundations, powders and blushers. If you want to create a contrast, then go with the opposite toned colors on your eyes and lips.
For more helpful tidbits, makeup reviews and more, visit often for updates. Questions and comments always welcome;) You can also Subscribe by clicking the last link on the right side of this page. —->
Kristine Marie
~ Dealing with Expired Makeup ~
October 2, 2009
We have all done it. You, me, and that girl over there——>
We have ALL held onto some of our cosmetic purchases just a bit too long. While it seems harmless, in all actuality this can be a serious problem and if you are having skin issues that you cannot pinpoint, here is the place to start looking:

Yes. Your cosmetic bag!
Firstly, all cosmetics have a life span. Some more than others but a life span nonetheless. Higher end cosmetics included. Paying more for an item doesn’t mean it can go beyond the recommended life span of more inexpensive brands.
Second, during the manufacturing process, all items are exposed to a certain level of bacteria ( mostly harmless) but after a certain period of time and use this bacteria can become dangerous and cause irritation and possible infection. For example – Your mascara wand is introduced to bacteria from the moment it comes out of the tube. Continuous opening, exposure and pushing back into the tube pumps more bacteria into the product. So, remember – The clock begins ticking the moment you open any product.
The best way to track when the time is “up” on a product, is to count forward from the purchase date to the estimated expiration (see guidelines below) and mark on your calendar when to toss specific items, or put a small label with the expiration date on your product. This way, there is NO question and much less risks.
Knowing the life span of your cosmetics is a good start to getting the best result from your investment as well as avoiding other , more serious issues. Here is a list of basic cosmetic products and the post opening (from the time you open it) life span before it needs to be replaced.
- Eyeliner/Lipliner pencils- 12 – 18 months (sanitize and sharpened often)
- Liquid Liner- 3 months maximum
- Liquid Products – 6 -12 months
- Cream Products – 6-12 months
- Powder products – 18-24 months
- Mascaras- 3 months maximum
*Please keep in mind these are basic guidelines provided you are sanitizing your products on a regular basis and using excellent hygiene and storage methods. While opinions may vary on this topic, I am merely suggesting this information as told to me by Dermatologist/Dermatopathologist. I urge you to take great care and concern in your research when determining guidelines for your safety.
** All-natural brands may have a shorter life span. Please consult the manufacturer or package for more information.
“AN OUNCE OF PREVENTION IS WORTH A POUND OF CURE” Here are some tips to guide your way:
WASH YOUR HANDS: One thing you can do to get the most of the life span is to ALWAYS make sure your hands are clean and sanitized before handling your cosmetics. Keep a bottle of sanitizer on your makeup table or in your beauty bag and use it, every time.
STORAGE: Store your makeup properly in a cool, dry place. Do NOT leave makeup in handbags, cars, or humid bathrooms. These are all breeding grounds for bacterias.
AVOID SHARING: Do NOT share makeup, EVER and avoid testers at cosmetic stores and counters. Do not participate in makeup swaps on used items. You don’t know how many hundreds of hands have touched that eyeshadow, mouths have tried that lipstick – or where those hands and mouths have been.
WASH YOUR TOOLS: Dispose of disposables..do not try to use those cosmetic wedges all week long. There is a REASON they are disposable. Also, WASH your puffs, brushes and other tools once weekly in a gentle or antibacterial soap and lay flat to dry. Bacteria infested applicators will affect your entire product.
DON”T ADD WATER: Never add water to products to “refresh” them or extend life as water carries bacterias too, and sealing it into a product bottle will only make things worse.
SANITIZE PRODUCTS: You can properly sanitize certain products and tools with an easy, inexpensive method to get the most use from your cosmetic investment. A bottle of Isopropyl Alcohol ( at least 70%) and a small 4oz spray bottle is all you need and you can find these items at any dollar type store.
- Use common sense here – Do NOT spray alcohol into liquid products, or mascara tubes/wands, liquid eyeliners, foundations, or loose powder products like powders and shadows.
- Do lightly spritz eyeliner/lipliner pencils, solid dry products in pans, tweezers, sharpeners and mascara curlers (remove pad first, replace when complete). A light spritz from 6-8 inches away should do the trick. Alcohol dries quickly and you can replace the caps and the job is done.
NOTE CHANGES: In smell, texture and color. If you see signs of breakdown in any of these areas, best to be safe rather than sorry. Toss it!

Finally, at the sign of any irritation/infection, dispose of all products, sanitize your makeup areas and skip makeup purchases or application until the infection clears. It isn’t worth the discomfort, appearance, embarrassment, doctor visits, cost or anything else to insist on holding onto that eyeliner or mascara.
A truly beautiful woman is a smart, healthy woman who knows when to say “No More” to that lipstick she wore to Aunt Megs funeral in ‘84. Buying new makeup is fun, and your health is the best excuse to explore new products, brands and looks. Enjoy!
Get your Beauty Alert Stickers here: http://www.beautyalert.biz/
KristineMarie
~ Tips to Wake Up A Tired Face ~
September 24, 2009

Have you ever spent just a liiiiittle too much time playing late at night?
Sure you have. We ALL have;) So, here are a few quick tips to helping you look a bit brighter and more awake when it’s time to go back to work in the morning;) Try a few and wow yourself with results!
* Wake up your skin with a good morning rinse of warm water and finish up with COLD water. This will get your blood circulating, tighten your pores and get your skin ready for some glowing.
* Add a luminizer to your foundation or moisturizer to give a hint of radiance to your “stayed out too late” skin.A few drops of BENEFIT HIGH BEAM pink luminizing liquid (($24 USD at Sephora and Ulta stores) blended into your product should do the trick!

* Optional Step – Benefit also makes a fabulous product called Lemon-aid. It is described as ” a soft yellow correcting cream that instantly hides redness and discoloration on your eyelids.” I just call it a little miracle. Found at Sephora for $20 USD. Also can be used as an eyeshadow primer for those multi-taskers out there;)
* Conceal the evidence… but beware of the reverse raccoon effect. Try to stick with a concealer that is no more than 1 shade lighter than your skin. Applying it with your fingertips will warm the product and allow it to better blend into your skin. Using your ring finger ( as it is the weakest of your fingers) gently pat the concealer in to problem spots and dark circles. Set with a very light dusting of powder. I use BEN NYE Nuetral set (See Reviews in the side menu for more information——->)
* Lighten up! Your eyes that is. Open tired eyes with a soft WHITE eye kohl pencil by lining the lower waterline. You can also add a touch the the inner tear duct area and gently blend it in with your fingertip. This makes eyes not only appear brighter, but larger and more open. Let the sun shine IN! RIMMEL of London makes a creamy soft eye kohl for around $3.50 USD found at CVS, ULTA and TARGET stores.
* Use a highlighter such a Benefit Eye Bright ($20 USD at Sephora.com) to wake up and life tired eyes. Dab a little in the inner corner of eyes, just under the eye, just under the browbone and to on the outer corner of eyes for a quick lift and bright, wide awake look. Another affordable option is the Sally Hansen all over Face brightener for around $8.99 USD (CVS and Ulta)

* Add some blush. Using your fingers, dab a hint of your favorite pink toned cream blush or even lipstick to your cheeks. Don’t overdo this. Just a touch onto your apples and using 2 fingers (again, to warm up the product) blend in and back toward your temple. Pink adds a healthy look and is universally flattering on everyone. Sally Hansen makes great cream blushes inspired by the makeup artist Carmindy ( from TV’s WHAT NOT TO WEAR show) and the color BLOOM is perfect for everyday. Can also be used over a lip balm for a hint of tint to get the most out of your $8.99 USD investment.

* Show your smile and follow up with a nude or pink lipgloss. You can find some inexpensive mineral glosses in several beautiful shades at eyeslipsface.com. They are paraben free and have vitamins A and E , and are a steal at only $3 USD, so you can stock up. Au Natural and Pageant Princess are beautiful shades I love. http://www.eyeslipsface.com/products_minerals.asp?dept_id=1396
* The smile just lifts the face and puts everyone in a brighter mood!

* Drink water! Flushing your bodys toxins and hydrating properly will get your skin back on track. Until then, the steps above will help you fake it until you make it there;)
So there you have it. A few tricks to add to your routine when you play hard and work hard. Enjoy these tips and try one, or all of them to wake up the overtired party girl in you;)
KristineMarie
~ Bridal Makeup, Flawless Foundation ~
September 23, 2009
In this Part Two of Bridal makeup tips, I will give tips & tricks on creating a flawless foundation for those who are braving the mission of self makeup on the Big Day. Please view my post on Bridal Skin Care tips as a starting point:
https://kristinemarie.wordpress.com/2009/08/02/bridal-makeup-tips-skin-prep/
After all, no amount of makeup in the world will compare with healthy radiant skin;) Ok, here we go….

Know your skin type:
The first step in choosing a foundation is knowing your skin type. Is your skin very dry and flaky? Is is very oily with a lot of shine? Is is a little of both in certain areas?Sensitive/acne prone? Is it just fine and dandy aka normal? Knowing the type of skin you have is essential to choosing the right formulation of foundation for that special day.
Know your undertones:
You have heard the terms “Cool” and “warm” used in describing skin tones, right? Well, if you aren’t sure what undertone you have , take a look at your wrists. Yes! Your wrists. If the veins appear to be Blue and you have other factors such as being likely to burn in the sun and pinkish color in your face or chest area..then likely you are a “cool”. If your veins are more Green and you have good luck in the sun ( tan well) and have more hints of yellow or peach in your skin , it is most likely you are a “warm”.

Pink or yellow undertones?
Know what you want:
It is essential to determine what kind of coverage you will want for your wedding day. While most automatically think a full coverage is a no-brainer, it simply is not necessary for many. Full coverage foundations can often feel heavy and cover the true radiance of your natural skin. In doing this, you look less like yourself, and more like someone who is simply covering up with makeup. Unless you need a full coverage foundation for excessive skin damages or flaws, consider a medium , lighter coverage or sheer coverage foundation. Skin is in!
You will also need to consider if you want cream or liquid, or powder.
* I STRONGLY suggest a cream or liquid foundation for long wear and a natural look.
Also consider the “finish” you desire. Finishes vary from Matte ( no shine at all) to Dewy ( think morning dew!).
Getting the perfect match:
Armed with this information, I would HIGHLY suggest going to a makeup counter to be “matched” for a foundation for your wedding day. It is certainly easier than spending hours in drugstores trying to guess, and a heap of dollars in products that you later find don’t really work. There is nothing worse than bridal photos of a beautiful woman with a face that is clearly an unnatural color, texture or doesn’t match the skin on her neck and body at all.

At the counter:
Tell the advisor matching you what you want (sans SPF if possible as SPF tends to have negative effects on flash photography) and also get a concealer (if needed) to compliment the foundation. Try it on and go outside in the natural daylight to make sure it blends seamlessly. Department store lighting can be deceiving.
*Options vary, but Estee Lauder, MAC and Clinique offer excellent foundations in a variety of colors, coverages and finishes.
Before applying foundation:
After cleansing, pat dry gently and apply moisturizer all over the face in upward strokes. If needed, apply an eye cream as well for extra hydration in that area. Then apply a lip balm. Allow about 10 minutes for your moisturizer to really set into skin. Avoid products with SPF as the properties in them can cause an adverse effect with flash photography.
Next, you will want to apply a good skin primer to your skin as it will give your foundation a good base to hang onto providing smoother application and longer wear. Apply a dot to forehead, cheeks and chin and blend well.
* Among industry favorites are primers such as Photofinish by SMASHBOX and Mac Prep & Prime

Application:
Now, apply your foundation. You can use whatever method you like best. Foundation brush, cosmetic sponge, stippling brush, kabuki brush, fingers, blender sponge…whatever works best for you.
*I prefer a large stippling brush ( also known as a skunk brush due to the 2 tone colors of black and white bristles) as it offers a lovely airbrush effect to liquid foundations. For cream foundations, a kabuki style brush offers a lovely finish.

Next, apply your concealer. Do not overapply. Simply press in with your fingertips to areas of concern and pat lightly to blend. Use a light sweep of powder on an eyeshadow blending brush to gently set the concealer. Do not powder the rest of your face yet….
*Using the fingertips is great because the warmth of your skin will warm the product making blending seamless. A light powder is essential to make concealer last. I prefer BENEFITS powderflauge or MAC Prep+Prime powder for this.
I hope these tips prove helpful and I will be following up with Part 3 in this series very soon. It will address blush, setting powder, filling in brows and highlighting. Stay tuned;)
KristineMarie
~ Using MAC Pigments ~
September 19, 2009
Pigments are basically highly condensed cosmetic powders. Most commonly known for their extreme colour payoff in eyeshadow use, they are not often enough used to their full potential. Here are a few basics on how to maximize the use of your pigments, followed by where you can purchase them.

Eyeshadow – Used dry they are true to colour and long lasting when used over a good eyeshadow primer. Use like any other loose shadow making sure to tap excess off your brush before applying. Use wet (do not soak, just dampen brush with water, Fix+, Visine or a mixing medium) before or after picking up colour) to maximize the vibrancy and staying power of your shadow.
Eyeliner – Again, use a mixing medium (listed above) to dampen brush. Pick up colour, tap excess and line those peepers.
Eyebrow Filler – Use dry with your favorite brow filler brush, tap off excess, and fill in brows. Add a touch of a highlighting colour just under the arch of your brow for an immediate eye lift. Use a colour one or two shades lighter than your brows for a natural look, or go deeper or more exotic for a night out.
* Not all pigments are safe for eye areas, so please be sure to check product information before purchasing or applying near eyes.
Highlighter – Use dry for highlighting above or below browbone, tops of cheekbones, center of nose, chin, cupids bow, forehead and or any other area you want to bring attention to. Use neutral/skin tone colours for best results. (MAC’s Provence, White and Vanilla are great for this)
Lipgloss – Mix a hint of pigment with clear gloss, lipbalm or vaseline to make a beautiful gloss. You can also place lip product on first, and tap colour on to your desired intensity. Use any shade you are feeling. Deep shades in berry are hot this fall;)

Blush – Using your ring finger you can put a dot or two of pigment onto the apples of your cheeks and blend in for a beautiful flush. You can also mix with a bit of facial moisturizer and apply with your fingers as you would any cream blush. Use pinks, corals and bronzes for natural results or magentas, plums and reds for something dramatic and bold.
Nail Polish – Simply drop some colour into a clear nail polish to have a perfect match to shadows, blushes or lipglosses. Mix colors for a unique signature colour all your own;)
Body Lotions/Sprays – Just a bit of pigment in your favorite lotion or spray will give your skin a shimmery glow. (MAC’s Vanilla, Jardin Aires and Gold Mode work beautifully for this!)
Hair Products – Pigment added to your hairspray, gel, wax or pomade can give you shimmer, colour or both. Have fun with this;)
** My favorites are MAC’s Vanilla, Gold Mode, and Rose. With these 3 colours, you can complete an entire look.

MAC is known for it’s quality pigments and the 7.5 gram jars you see pictured will last forever at a retail price of $19.50 USD. Unfortunately, many complain that they simply don’t use them enough for them to be worthwhile so hopefully this entry will change that. A few strategically chosen pigments can stretch your cosmetic dollars if you utilize these ideas.
If you want to try other brands you could look into colours offered by NYX, Loreal HIP, Urban Decay, Barry M, Obsessive Compulsive, Medusas makeup , Makeup Forever and more. Samples are also a great, inexpensive way to try pigments without breaking the bank. Deal with reliable seller you trust.
KristineMarie
~ Fall Beauty Trends 2009 ~
September 19, 2009
This Fall, the trend predictions are not only in, but are being seen coming to life everywhere. From runways to hallways, the looks are dramatic and rich and offer a sense of mystery…

(Photo by Richard Philips/MAC cosmetics)
Here are a few tips to help you fit in with even the trendiest of runway models and some recommendations for affordable/accessible products that won’t break the bank;)
1. Stick with a sheer matte foundation, or use a light dusting of translucent powder over your current tinted moisturizer from summer. This allows you to still show your skin, but keep the shine away. You want a simple, clean and even canvas for the beautiful color pallet of fall without the distractions of excess shine or too much coverage.

Soft and Sheer Tinted Moisturizer by BOOTS – http://www.us.boots.com/SoftSheerTintedmoisturizer/
Perfect Light Loose Powder by BOOTS – http://www.us.boots.com/PerfectLightLoosePowder/
2. Keep your eyebrows in! Stop plucking. Youthful full eyebrows are all the rage, so fill yours in with a natural colored shadow (1-2 shades lighter than your brows for dark hair and 1-2 shades darker for light hair) and use a brow gel to keep everything in place.
Brow Pencil By Boots – http://www.us.boots.com/BeautifulBrows/
Brow and Lash Groomer by Boots – http://www.us.boots.com/LashAndBrowPerfector/
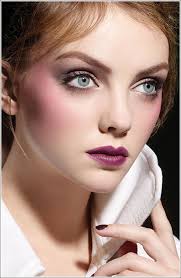
3. Rich fall colors are in so stick with Greens, Golds and Greys. Play up the season and go deep with the colors. Don’t forget a deep colored liner extended out straight (not curved up in a traditional cat eye) and a coat or two of dark mascara to play up those intense new peepers;)
Stay Perfect Eyeshadow Trio by BOOTS – http://www.us.boots.com/StayPerfectShadowPalette/
Amazing Eye Pencil by BOOTS – http://www.us.boots.com/AmazingEyesPencil/
Lash 360 Mascara by BOOTS – http://www.us.boots.com/Lash360Mascara/
4. Full lips in matte shades of wine, berry and more. Line lips to create fullness and fill in with your favorite new seasonal shade. Play up the plums or rev up your nights with red.

Stay Perfect Lip Lacquer by BOOTS – http://www.us.boots.com/StayPerfectLipLacquer/
5. Blush it on with a darker shade under cheekbones ( 1-2 shades darker than your skintone) and a pop of light rosy color on the apples. Contouring is back, so start reshaping those faces for fall;)
Natural Blush Cheek Color by BOOTS – http://www.us.boots.com/NaturallBlushCheekcolor/
Beauty professionals suggest one focus feature to play it way up, while keeping the other features more toned down. For example, a dramatic eye calls for a more neutral lip, and a Dramatic lip calls for a more neutral eye. You want to command attention, not overpower .
Enjoy these tips and try some new looks on your own, or contact me for an affordable Fall Makeover or Makeup lesson. All lessons include basic instruction sheets, skin care tips, samples, and a personal shopping list to customize your new look as well as your budget. Group Makeup Lessons also available. Perfect for bridal showers or a Ladies Night In.
Kristine Marie

